Introduction
The main purpose of establishing a Single Sign On (SSO) process with Absorb is to allow your users a single point of entry into your system while providing them access to multiple other independent systems. With this process a user logs in with a single ID to gain access to a multitude of other systems without being prompted for different usernames and passwords.
This article discusses Incoming SAML 2.0 SSO for clients using Active Directory Federation Services (ADFS) and presents a somewhat abridged and focused version of our full Incoming SAML 2.0 Single Sign-On article. For the purposes of this article the Absorb system will act as the Service provider (SP). Your ADFS system will act as the Identity Provider (IdP).
Please note that SSO is an additional feature that usually involves an additional fee and technical resources on the client side to develop and/or configure the solution.
Disclaimer: Absorb LMS supports Incoming SAML 2.0 Single Sign-On as a feature, however we do not officially support any specific client-side (IdP) solution. Although ADFS is known to generally work with our implementation of SAML SSO, it is the client's responsibility to configure/develop and maintain their side of the integration. This will require a client resource who is knowledgeable and familiar with your particular ADFS environment. This guide is provided to our clients as a convenience only, based on our past experience working with clients who employ ADFS.
Table of Contents:
Instructions:
Absorb Setup
This section will walk through how you would configure your Absorb LMS. Once ADFS is set up in your company account, a System Admin will need to log into the LMS and complete the setup.
From Portal Settings, there is a button in the right-side context menu labeled Manage SSO Settings. If you cannot see this button, please contact your Absorb Client Success Manager to discuss enabling the feature.
Once you have clicked the button, you will be brought to the Manage Single Sign-On Settings page. Any existing configurations will appear here, as well as the option to Add a new one.
Each route (Portal URL, e.g. company.myabsorb.com) can have its own set of SSO configurations. Please see this article for more information on route-based SSO. The remainder of this article assumes we're talking about a single SSO configuration.
Managing SSO Setting Variables
The following variables will need to be determined and configured as part of your SSO implementation.
|
Variables |
Description |
Requirement |
|---|---|---|
|
Name |
Enter a value to identify this SSO configuration. This field is for your reference only. |
Mandatory |
|
Method |
Select SAML. |
Mandatory |
|
Key |
The key is the x509 public certificate of the IdP that is used for the SAML assertion signature. You must configure Absorb with your IdP’s public key so that Absorb can verify your signed SAML assertions. |
Mandatory |
|
Mode |
Choose the request mode to be used, from either Service Provider Initiated or Identity Provider Initiated.
|
Mandatory |
|
ID Property (Unique Identifier) |
A unique identifier field is chosen in the Absorb LMS to be used as the identifying NameID through the SAML assertion. Absorb can be configured to use the following as the Id Property:
|
Mandatory |
|
Signature Type |
Select the correct option for your configuration. |
Mandatory |
|
Login URL |
|
• Mandatory for SP-initiated • Mandatory for IDP-initiated with Automatically Redirect ON • Optional for IDP-initiated with Automatically Redirect OFF |
|
Logout URL |
This is the URL where Absorb redirects users when they log out of the Absorb system. |
Optional |
|
Single Logout |
Enables the single sign-out endpoint. This will attempt to sign the learner out of the identity provider when they log out of the LMS. If this is on, the Logout URL set above will be ignored. |
Optional |
|
External Single Logout URL |
The external SLO endpoint to direct single log-out requests to. |
Optional |
|
Wait for IDP Response |
Forces Absorb to wait for a response from the identity provider before logging out of Absorb. |
Optional |
|
Enforce Admin Side SSO |
Enforces SSO Redirection on the Admin login page. |
Optional |
|
Automatically Redirect |
This setting only displays when Identity Provider Initiated Mode is selected. When turned on, this will redirect all users who navigate directly to the selected Route(s) to the Login URL. If not turned on, users will land on the portal's landing page. |
Optional |
|
Assigned Routes |
Use this field to search for and select a Route or Routes to assign to this SSO configuration. A Route must be selected in order for SSO authentication to be successful. This Route will be referenced in the settings you configure in your Identity Provider. |
Mandatory |
|
Allow User Provisioning |
This setting determines whether User Provisioning is enabled. To successfully create users via this method, the required values must be sent in the Attribute Statement. For further details, see our article on user provisioning: Incoming SAML 2.0 SSO Account Provisioning |
Optional |
ADFS Setup
Login URL
From the ADFS Management application, right-click on Service from the left tree-view and click on Edit Federation Service Properties. This is where you can find your Federation Service Name, from which you can determine the Login URL value to enter into the Absorb SSO Settings. The Login URL is determined based on which mode you are using: Service Provider Initiated or Identity Provider Initiated. Service Provider Initiated Mode is recommended.
Service Provider Initiated Mode
Take your Federation Service Name and add “/adfs/ls/” to the end.
So for example if your Federation Service Name is https://adfs.company.com the Login URL to enter into Absorb will be https://adfs.company.com/adfs/ls/
Identity Provider Initiated Mode
Take your Federation Service Name and add “/adfs/ls/IdpInitiatedSignOn.aspx” to the end.
So for example if your Federation Service Name is https://adfs.company.com the Login URL to enter into Absorb will be https://adfs.company.com/adfs/ls/IdpInitiatedSignOn.aspx
If you have multiple sites setup on your ADFS then you can bypass site selection by adding “?loginToRp=https://subdomain.myabsorb.com” to the end of the URL.
So continuing the prior example, your Login URL would be https://adfs.company.com/adfs/ls/IdpInitiatedSignOn.aspx?loginToRp=https://company.myabsorb.com
Key / X509 Certificate
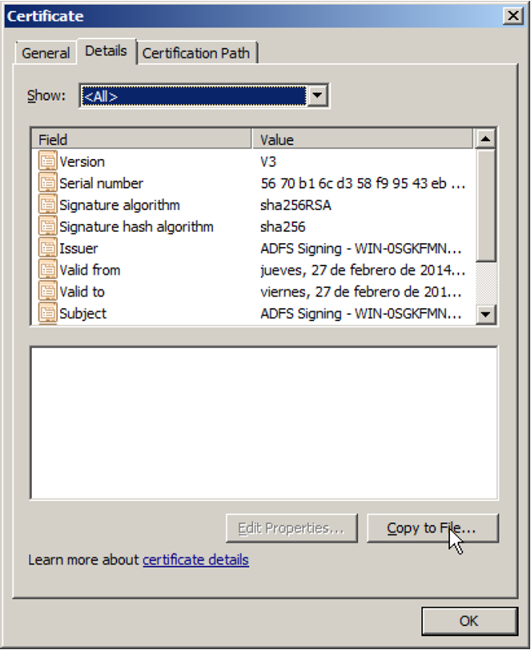
- Go to Certificates entry on the left tree view, right-click on Token-Signing certificate then click on View Certificate.
- On certificate details tab click on copy to file, then the certificate Export wizard launches.
- Click on next, select “Base-64 encoded X.509 (.CER)” format and save the certificate.
- Copy the certificate using a text editor or similar and enter it into the Key field in Absorb (see Managing SSO Settings section above).
Note: The Login URL and X509 Certificate (key) can also be retrieved from a SAML metadata file exported from ADFS.
Relying Party Trust
The connection between Absorb and ADFS is defined using Relying Party Trust. The steps below can be followed to set this up manually, or you can try importing our SP Metadata. This article has our metadata, which can also be downloaded at the bottom of the page.
Note: updates will need to be made related to your particular LMS URL prior to using the metadata.
To manually configure the Relying Party Trust:
- Select the Relying Party Trusts folder from ADFS Management, and add a new Standard Relying Party Trust from the Actions sidebar. On the Select Data Source screen, select the last option, Enter Data about the Party Manually.
- On the Specify Display Name screen enter a Display Name to identify this SSO setup.
- Skip the Configure Certificate screen by clicking Next.
- On the Configure URL screen check the box labeled Enable Support for the SAML 2.0 Web SSO protocol. Set the service URL as https://PortalURL/api/rest/v2/authentication/saml.
- Under Configure Identifiers, enter the LMS URL as the Relying Party Trust Identifier.

- On Choose Issuance Authorization Rules, select the Permit all users to access this relying party radio button.
- On the next two screens, the wizard will display an overview of your settings. On the final screen use the Close button to exit.
- Right-click on the relying party you’ve just created and select Properties. In the Advanced tab ensure SHA-1 is selected for the secure hash algorithm.
Claim Rules
- Select “Send LDAP Attribute as Claims” as the rule template, next, then select “Active Directory” as Attribute store. Configure “E-Mail-Addresses” to map to Outgoing claim type “E-Mail Address”. This assumes you are using Email Address as the Absorb "Id Property" (Name ID), and will need to be adjusted if using some other field.
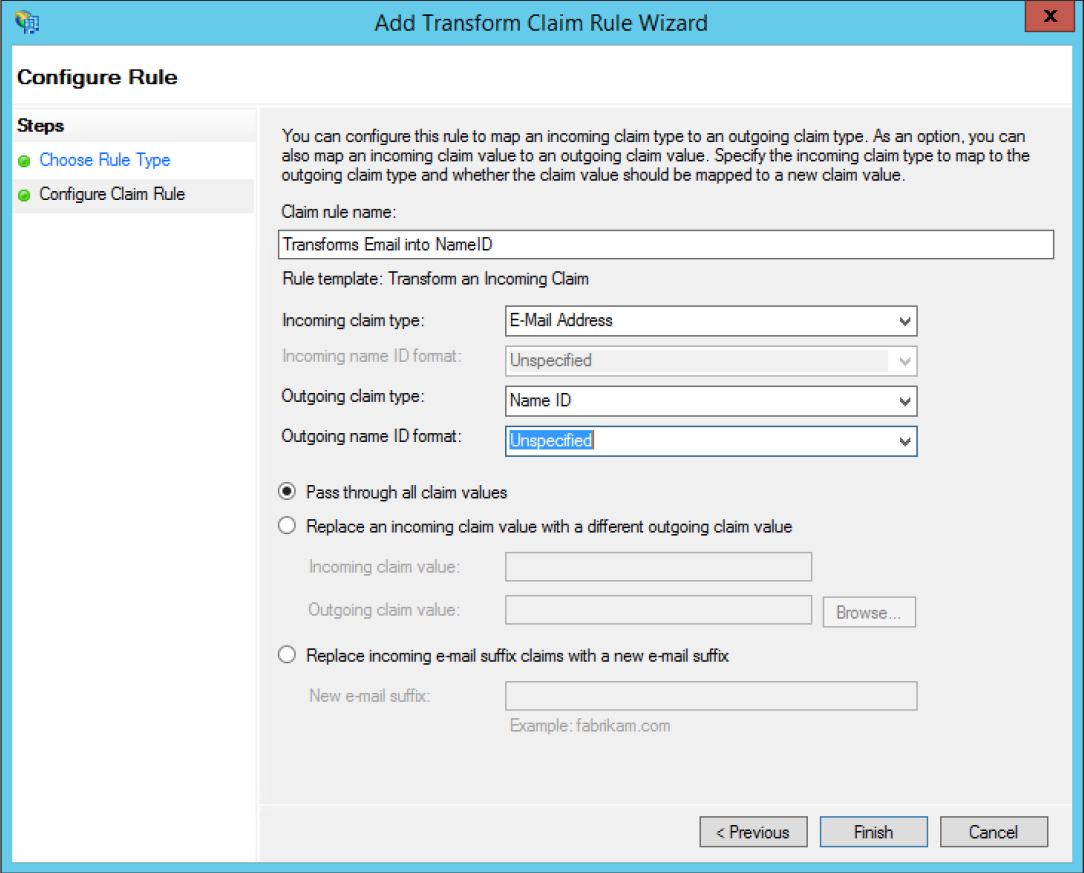
- Select “Transform an Incoming Claim” as the rule template. Configure Claim rule name “Email to Name ID” or similar, Incoming claim type: “E-Mail Address”, Outgoing claim type: “NameID”, outgoing name ID format: “Unspecified”. Again, this assumes you are using Email Address as the Name ID - adjust the Incoming claim type as appropriate if not.
IdP Metadata
You may have already exported the certificate manually in the ADFS Setup section above, but your IdP Metadata can also be used to obtain your public X509 certificate. The X509 certificate should be added to the Key field under Portal Settings in Absorb.
Troubleshooting
If errors are encountered, please refer to our SSO Troubleshooting guide.
Comments
Article is closed for comments.