Welcome to our FAQ guide! Here, we've put together a collection of commonly asked questions about Absorb LMS. Whether you're new to our services or a seasoned Admin, this guide is designed to provide you with clear and easy-to-understand answers to our most common support questions! Let's dive in and explore the answers you're looking for!
1. How do I access Absorb Academy?
Absorb Academy serves as a comprehensive Administrator training resource that caters to your instructional needs! Its purpose is to enhance overall admin user proficiency of the LMS software and give our clients the assurance they need to effectively harness our platform's capabilities. Absorb Academy has an array of offerings at your disposal: immerse yourself in Absorb Release Demos, navigate through Onboarding Guides, and partake in LMS Administrator trainings. Please reference the video below detailing how you may access Absorb Academy today!
2. How can I gain access to all of the files I've uploaded to the LMS?
At present, there are two avenues for accessing the file directory: the Old File Manager and the New File Manager. The Old File Manager is in play by default, whereas the New File Manager requires activation via toggle. Both interfaces present identical information, albeit with differing visual approaches. Notably, the New File Manager introduces advanced functionalities, including the ability to seamlessly replace an outdated file version with a new iteration across all instances in which it is employed.
Old File Manager:
New File Manager:
How to access the file managers:
3. Is there a report where I can pull the enrollment records for every user?
Yes, the Export All Enrollment Data report provides a comprehensive overview of enrollment records. More information about this report can be found in the article here.
4. How do I find all courses in a curriculum/bundle? How do I find all curricula/bundles containing a course?
To locate all Online Courses affiliated within a particular Curriculum/Bundle or to identify all curricula/bundles that include a specific Online Course, you may use the Refine button.
Here's an illustrative example of how you can locate all courses within the "Photography Bundle" Online Course Bundle and also determine the Curricula/Bundles to which the "Photography 101" Online Course is affiliated.
5. Why can't I see certain Users, or access greyed-out buttons in my Admin Interface?
The sections of the LMS accessible for viewing or modification by an Administrator are contingent upon the permissions assigned within the Admin's designated role. The scope of these permissions is determined by the User Management section, which defines the specific Group of individuals to whom these permissions are applicable.
Consider Helen Bateman as an example in the illustration below. As we navigate through her profile, it becomes evident that Helen's role is designated as Admin. Directly below, the label Permission Overview is displayed, providing an in-depth breakdown of various facets of the LMS and outlining what Helen, in her capacity as an Admin, has the ability to view or modify within each section.
Located just above the Roles segment is the User Management section. Within this category, you'll find three choices: All, Department, and Group. These configurations define the subset of Users that the Admin's Role Permissions will grant access to for management purposes.
If you are unable to find specific users within the LMS, you may also want to run a filter specifically for "Inactive" Users. Please reference the below illustration on how to do so:
6. I am getting an error when I try to upload my course as a learning object. Why?
If you receive an error message saying the following: "Sorry, something went wrong. If this problem persists, please contact your system administrator.", there could be a variety of factors contributing to this occurrence.
Below is a list of common issues to consider when troubleshooting 3rd party Learning Objects:
- Check the filename for any special characters and remove them. (i.e.: an apostrophe)
-
Check that the file type you're trying to upload matches the file type you chose within Absorb.
(EX: Attempting to upload a SCORM 1.2 file to the SCORM 2004 may prompt issues.)
Make sure that the zipped folder takes you straight to the course contents and not to another nested zipped folder.
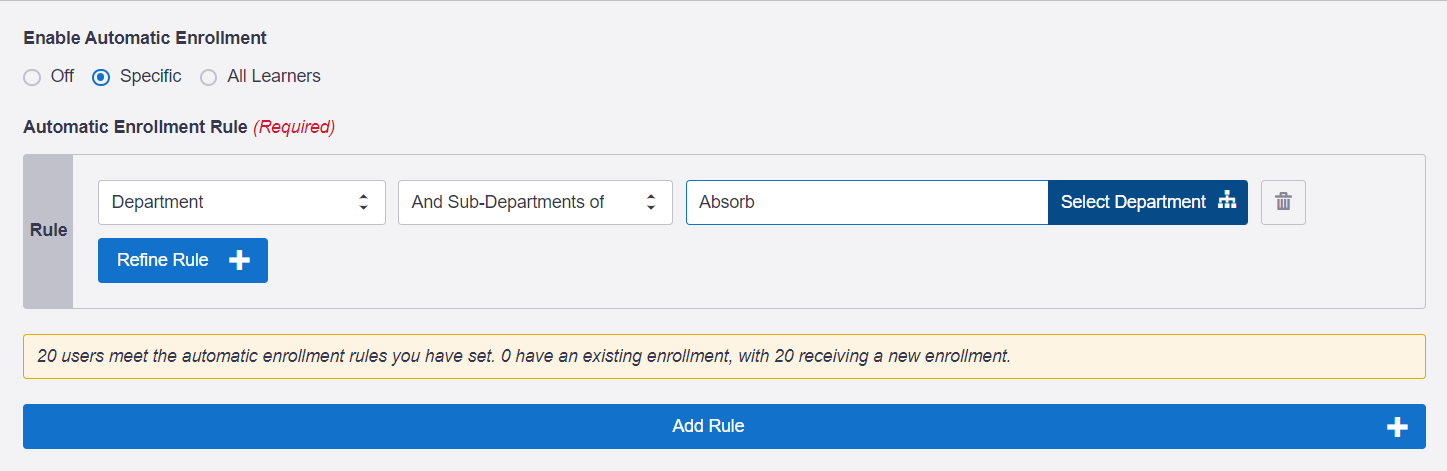
7. How can I set up an annual compliance training that automatically re-enrolls users upon certificate expiry?
- When configuring the initial Automatic Enrollment rules, ensure that they are targeting the correct group of current and future Users.
- Consider the example below. The Automatic Enrollments are set so that any User listed within the "Client Success" Department, or is in a sub-department of the "Client Success" Department, will be automatically enrolled into this particular course.
- Consider the example below. The Automatic Enrollments are set so that any User listed within the "Client Success" Department, or is in a sub-department of the "Client Success" Department, will be automatically enrolled into this particular course.
- Next, you'll need to activate the Certificates settings within an Online Course. Following this, you can either set a firm expiration date or utilize the Time from Completion option, which could result in the course or curriculum Certificate expiring one year after the User's completion.
- For instance, in the video below, the Online Course has been configured to expire one year after an individual User finishes it. By activating the Allow Re-enrollment toggle and adjusting the setting to Time before certificate expires for one month, you will be presented with the choice to Re-enroll automatically. With these parameters in play, a User would complete the Online Course, which would then have the Certificate expire in a year. However, Users would be automatically re-enrolled one month before the expiration date.
Within the Curriculum settings, you may set Post Enrollments rules so that when a user enrolls into a Curriculum, they are also automatically enrolled into the corresponding Online Courses within that Curriculum. As an example below, users that enroll into the Photography Curriculum will then be subsequently enrolled into both the Photography 101 and Photography 101 - Test Opt Out courses.
8. How can I create a customized, unique experience for a specific department?
Department Templates provide you with the means to personalize the Learner Experience within the LMS for each individual Department. When you make edits to a Department Template, you can be confident that the modifications will exclusively affect Learners belonging to that particular Department. For example, the images below present two very different Learner Experiences, but they are part of the same LMS:
In the video below, we review how a new Department Template can be added:
Customizing which Online Courses or Curriculum will be visible in a specific Department Template's Course Catalog is done through the enrollment rules. Therefore, Online Courses can be published across Departments, even if they have different Templates, via the Self-Enrollment or Automatic Enrollment rules.
When you create a new Department Template, you must change and save at least one aspect of that Template or the Template will be lost.
9. How can I reset or change a learner's status for a course or lesson?
You can reset a Learner's status for an Online Course or Lesson by navigating to the User's Transcript. You may access the User's Transcript directly either through the Users report or the Course Enrollments report specific to that Online Course.
10. How can I view, update, and make changes to a User's profile? Can I do this in mass?
Absorb LMS offers both singular and mass actions when using the Users report. These actions are showcased as follows:
To View User History
To access a User's History, you can select the User, click on Edit, and then select View History. This option enables you to review all modifications that have been made to the User's account.
To Mass Update Update User Profiles:
- Consider the User Field(s) you intend to update for a substantial number of Users, along with the values you wish to assign to those fields. These fields can encompass either the default options within the LMS or Custom Fields established by System Administrators in Portal Settings.
- Prepare a CSV spreadsheet comprising a roster of Users requiring bulk updates. Ensure the spreadsheet contains adequate information to establish connections with corresponding User accounts in the LMS. Incorporate columns for the fields necessitating updates, along with their freshly revised values. In the provided screenshot, the "Highest Degree" column serves as an illustrative field with newly intended values.
- Please advise that the User Import feature can process mass changes to existing Users in different Departments. However, if you are importing new Users, separate them and the corresponding CSV files by their intended Department.
- After you've identified the Users and fields slated for updates and crafted a CSV spreadsheet outlining the new field values, it's time to employ the User Import feature. This is where you'll proceed to upload the CSV file to Absorb LMS.
When needing to make bulk changes to the LMS, our professional services team is also an avenue to explore for an associated fee.
11. Why are my users not receiving emails? How can I tell if the email actually went out?
It is possible that your Users are not receiving emails for a few reasons. This section will work through a few potential causes of the concern, and showcase a method to confirm if an email was distributed.
Bcc Email Address
On the Portal Settings page of your LMS, there is a designated section labeled Bcc Email Address. By populating this field with an Email Address, all subsequent system-generated emails will be both recorded and forwarded to the Email Address of your choice. As the volume of emails can accumulate rapidly, it's recommended to establish a dedicated email solely for tracking purposes.
Message Templates
If Learners are reportedly not receiving emails, you may want to double check the Message Templates setting for the specific message that Users are not receiving. In the illustration below, we demonstrate how to navigate to the Message Template settings for Curriculum Enrollment notifications. If you want a Message Template to send, it must have the Send to Learner toggle turned on; additionally you may enable the Send to Administrators or Send to Supervisor toggle depending on your preferred audience.
If Send to Administrators is turned on but Send to Learner is not; the email will not be distributed. Send to Learner is required to be on for the Message Template to successfully distribute an email. This is because Email Addresses targeted by the Send to Administrator or Send to Supervisor toggles are treated as Bcc addresses for the email sent to the Learner. If the email is not sent to the Learner, an Admin or Supervisor will be unable to receive a copy of the email.
Course Email Settings
Another avenue you may want to check is within the actual Online Course settings themselves, housed within the Messages section. Examples of notification settings that you may want to ensure are toggled on are:
- Send enrollment email
- Send completion email
- Send nudge email
- Send failure email
Below is an illustration showcasing how you may access these settings and confirm that they are configured appropriately.
12. What is the difference between re-enrolling a user and un-enrolling a user?
After you've chosen a User from the Course Enrollments report, Administrators who possess the required permissions have the opportunity to select either Re-Enroll User or Un-Enroll User. Historical Enrollment records are impacted differently depending on which method is used. There are a few distinct differences to cover:
Re-Enroll User
When choosing to Re-enroll a User into a particular Online Course or Curriculum, this action will reset their Online Course and Lesson statuses. Any previous Enrollments will be pushed to the Historical Enrollments page for the purpose of recording data.
Un-Enroll User
When choosing to Un-enroll a User from a particular Online Course or Curriculum, this action will completely remove the User from the Enrollment records. Their Enrollment will not be stored within the Historical Enrollments page, and that data will be lost. This feature is commonly used when there is an accidental Enrollment that needs to be removed, rather than for Re-certification or Re-completion.
You can also use a display column for Enrollment Method to see how a User was enrolled into an Online Course.
13. If I change the automatic enrollment rules on a published course, how will previously enrolled users be impacted?
All previous Enrollments will remain in place and Users will not be Un-enrolled or receive a notification of the change. New Users meeting the new Enrollment criteria will be Automatically Enrolled in the Online Course.
14. Why are courses I have created not appearing in the Course Catalog?
Online Courses not appearing within the Course Catalog could occur for a number of reasons. Below are a few troubleshooting tips and settings to check for!
- Check that your Online Course is Active!
2. In the Enrollment Rules section of an Online Course or Curriculum, you'll find the Self-Enrollment option. This can be set to specific – allowing only a defined subset of Users to access it – or turned Off altogether. Remember, these Self-Enrollment settings directly impact what will appear in the Course Catalog.
3. Within the Manage Template section of the LMS, there's an option called Always Hide Enrolled Courses. When you toggle this ON, any Online Course a User has already enrolled in will be hidden from their view in the Catalog.
4. Within the Manage Template section of the LMS, you have the option to turn on Hide Courses outside Curricula. If you toggle this to ON, any Online Course that's part of a Curriculum won't appear in the Course Catalog. Instead, Learners will only see the Curriculum itself.
15. Why is the "Schedule Report" button greyed out?
The reason you often see the Schedule Report button grayed out is because it's necessary to Save a Custom Report Layout first before scheduling it. To get a clear picture of how to Save and schedule your reports, check out the video below! It'll walk you through the process.
Comments
Article is closed for comments.